FinalCif
FinalCIF simplifies the process of preparing CIF files for publication, which usually involves tedious manual work. It automatically gathers necessary information from the work folder, but also allows for easy manual input of missing details. In ideal cases, it takes just one click to create a publication-ready file—though it’s always wise to review the file afterwards. No software is flawless!
Since the end of 2024, a special version of FinalCif has been available within APEX, part of the Bruker software suite. Instead of gathering information from the work folder, this version directly accesses the APEX database to complete the CIF data. Therefore, if you’re using APEX, it’s recommended to do all your work within APEX to ensure all information is centrally and fully available. Despite its integration with APEX, this version of FinalCif will remain independent of Bruker AXS. It will continue to support CIF files from any other company’s software as well.
Transferring work between two APEX computers is simple—either archive and restore the sample as a .zip file within APEX, or import the [sample name].xml file from the frames folder. They contain every database information of a sample.
Back to the FinalCif home page
Introduction
CIF files from SHELXL often lack key details needed for publication. Editing these files manually can lead to errors. FinalCif helps by pulling information from the corresponding ‘work’ folder, which contains files like SAINT, SADABS, and SHELX list files.
FinalCif’s main table displays the .cif file data in three columns: the left shows the original CIF data, the middle displays data from other sources (like the .p4p file), and the right allows user input, which overrides all other values. Templates make it easy to add author info, machine models, or create dropdowns for specific CIF keywords.
Fields marked with a question mark require attention and appear at the top of the table. Each input field supports Unicode characters like umlauts, which are automatically converted to CIF-compliant ASCII format. Input fields are also validated, turning red if invalid data is entered.
You can run CheckCif online (HTML/PDF) or offline from within FinalCif to check the result. The button “save cif file” saves under ‘name’-finalcif.cif, leaving the original file unchanged. The FinalCif executable also accepts file names as arguments to open .cif files from other programs like ShelXle.
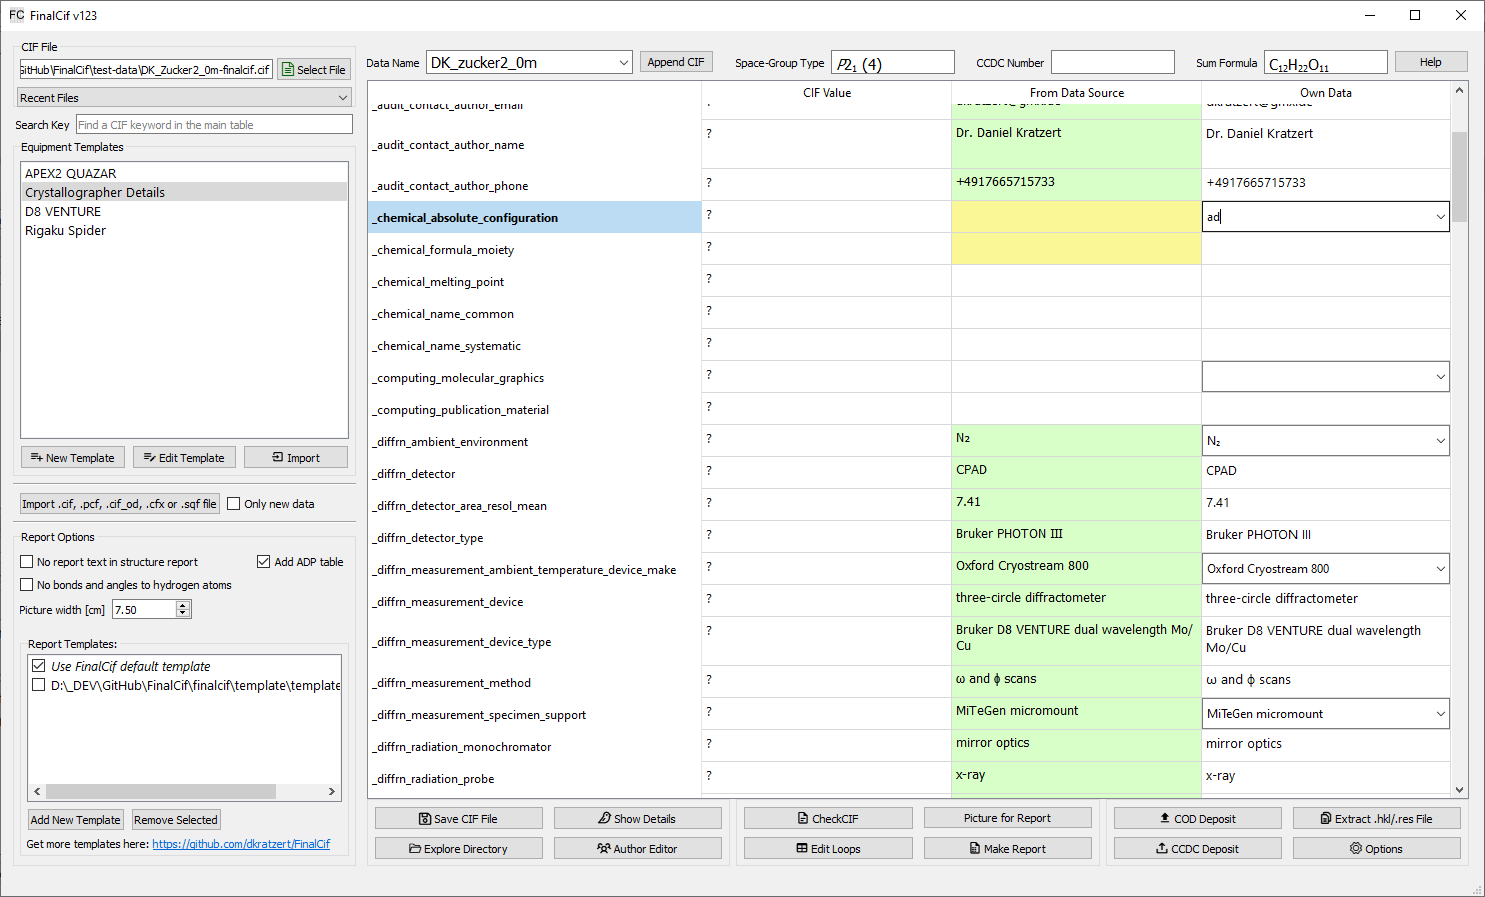
The FinalCif main window.
A workflow example
Open a cif file in a work folder.
Check and edit the remaining items.
Do a html checkcif (it also saves an image for the report). Probably correct last items like the moiety formula and explain alerts with the validation response form editor in the same window.
Do a pdf checkcif
Submit the CIF to the CCDC
Drag&drop the CCDC deposit reply email into the work folder, or edit the CCDC number manually
Click on „Make Tables“
Files used by FinalCif
For CIF files from Bruker data, FinalCif needs the following files in the same folder as the CIF file: * SADBABS .abs * SAINT _0m._ls, _01._ls * Bruker _0m.p4p * One frame like _ib_01_0001.sfrm * A .eml email file for the CCDC number * the .hkl and .res file content of the CIF itself
Non-Bruker Data
For Rigaku and STOE datasets, it is not necessary for FinalCif to collect information from various files. Instead, it is sufficient to import a certain CIF created during the experiment. Rigaku produces a ‘.cif_od’ file and STOE a ‘.cfx’ file for example. Also the Bruker ‘.pcf’ file is importable. You can import any additional CIF formatted file with the ‘Import’ button on the left center. This will open an import dialog where all key/values and loops from the file except for unit cell and space group information is pre-seleted. The seleted items are then imported with the “Import Selected” button.
CIF format specification
FinalCif uses the IUCr CIF specification 1.1. Among other minor restrictions, this means that the ‘global_’ keyword is not allowed in FinalCif. Some CIF writing programs still use the ‘global_’ keyword. You may circumvent this by exchanging the ‘global_’ key with a ‘data_’ keyword and delete the subsequent ‘data_’.
Since version 99, FinalCif supports multi-CIFs, so CIF files with multiple ‘data_’ blocks can be opened and edited. Please note that auto-filling of missing values is disabled in multi-CIF mode. Some other functions, such as renaming a data block, do not work in multi-CIF mode. It is advisable to complete each CIF before creating a multi-CIF.
A data block can be removed from a multi-CIF by selecting the corresponding block and right-clicking on the data block selector. A menu then opens for the function to delete the block.

Selector for data blocks in a multi-CIF.
Help for CIF keywords
A click on one of the CIF keywords in the vertical header of the main table pops up a window with explanations about the specific keyword.
Installation
Windows
Start the installer (FinalCif-setup-x64-vXX.exe) and click next until finished.
Linux
Thanks to Andrius Merkys, Debian and Ubuntu have FinalCif in their official distribution.
Any System
Alternatively, there is a pypi package for FinalCif:
Since version 118, there is a pypi package for installation in a Python environment. Do the following steps in order to install and run FinalCif in any Python environment:
>> python -m venv venv        <-- creates a virtual environment
>> source venv/bin/activate   (Windows: venv\Scripts\activate.bat)  <-- Activates the environment
>> pip install finalcif
>> finalcif
Next time, only
>> source venv/bin/activate   (Windows: venv\Scripts\activate.bat)
>> finalcif
is necessary.
Templates
FinalCif uses three different kinds of templates to simplify recurring tasks:
Large text templates
Each editable text field in the main table can hold text snippets as templates for reoccurring texts. The text template editor opens with the tiny ‘edit’ button that appears as long as the mouse cursor hovers over the field. Also a right-click in the main table on “Text Template” opens the editor. The editor is an a new page where the first line shows the CIF key from the row of the previous mouse click. In the large text field right-below, you can type any text and apply it with the “Apply Text” button, or you compose any kind of text snippets in the input fields left-below. These fields can be saved with the “Save as Template” button. A saved template is indicated with light-gray background color in the respective edit field of the main table.
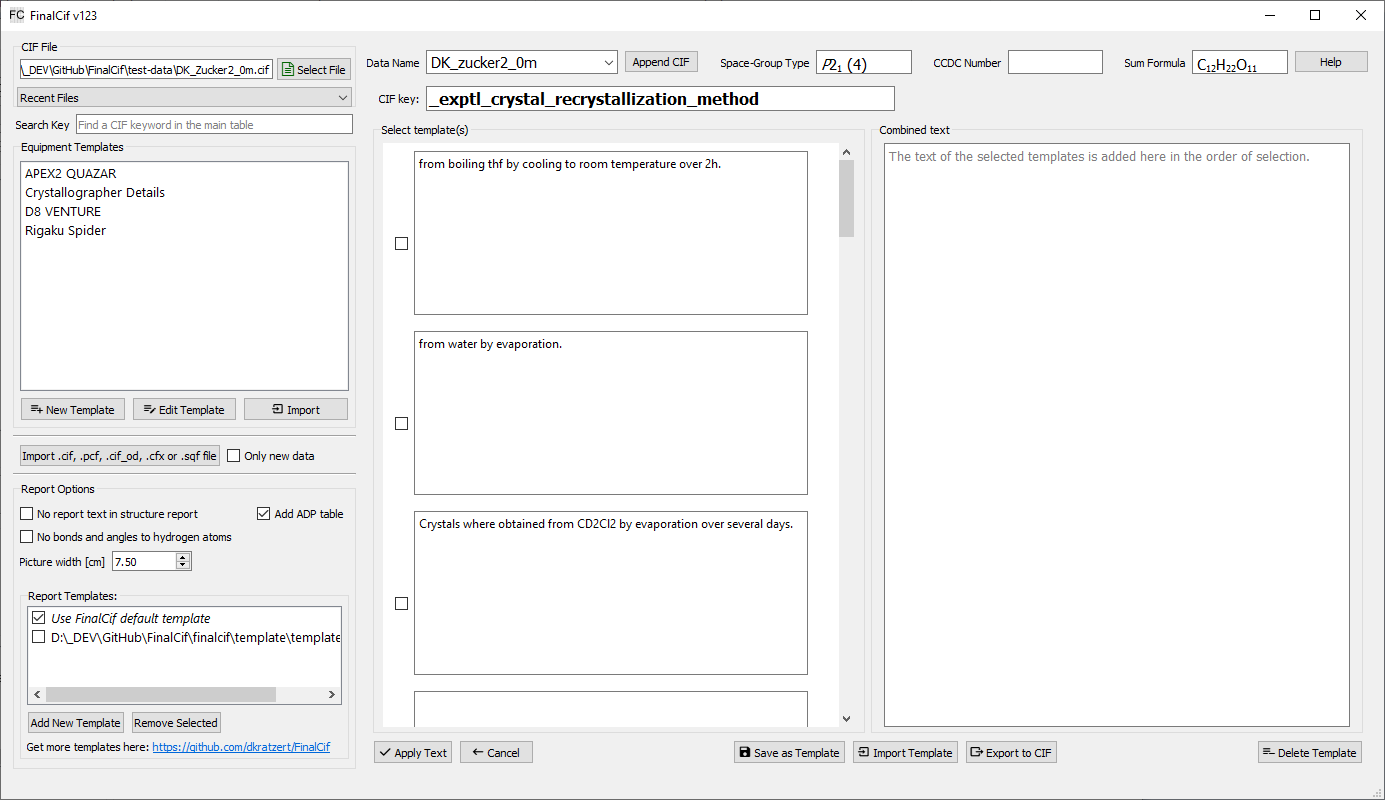
The template editor for large text snippets.
After you saved something as template, it will be loaded again if the editor is opened again on this same CIF key row. The trick here is that you can click the checkboxes before each text snippet to append the text of it to the “combined Text” field in click order. As any other templates in FinalCif, you can export/import them to CIF files. “Delete Template” deletes it from the configuration and will not show up again. So large text templates are usable either as a comfortable text editor and/or as template manager. For validation response forms, so CIF keywords starting with _vrf_, the template editor stores the template with the key _vrf_PLAT[number] rather than the full name. This also makes it usable as a template collection for validation responses with checkCIF.
Equipment templates
They are useful for definitions of parameters like the properties of a measurement device or the name and address of the crystallographer. Apply template by double-clicking the respective row.

The templates selection.
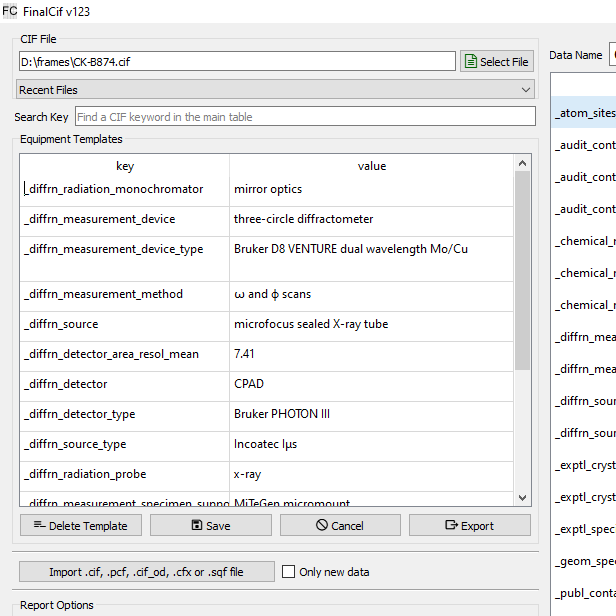
The equipment templates editor.
Property templates
Property templates define possible dropdown-menus for common CIF keywords like _cell_measurement_temperature. After saving the respective template, its values are accessible as a dropdown menu behind the respective key in the main table of FinalCif. The property templates list is located on the Options page.
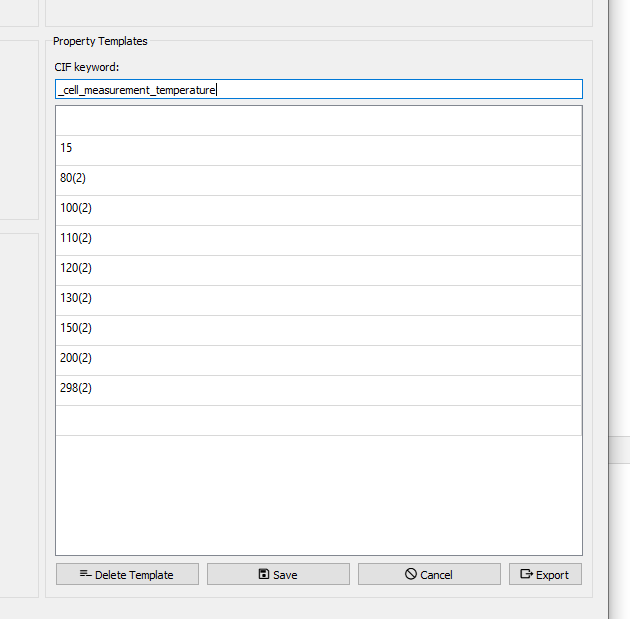
Template editor for cell measurement temperature.
Templates can be edited anytime and they can be saved as a CIF file. You can use them for any cif keyword. Just be creative…
Sidenotes
As any other CIF, in order to import a template, it needs a data_ keyword at the start.
Templates may be multi-CIFs with multiple data_ kewords for e.g. multiple machine definitions in one file.
Loops
General Loop Editor
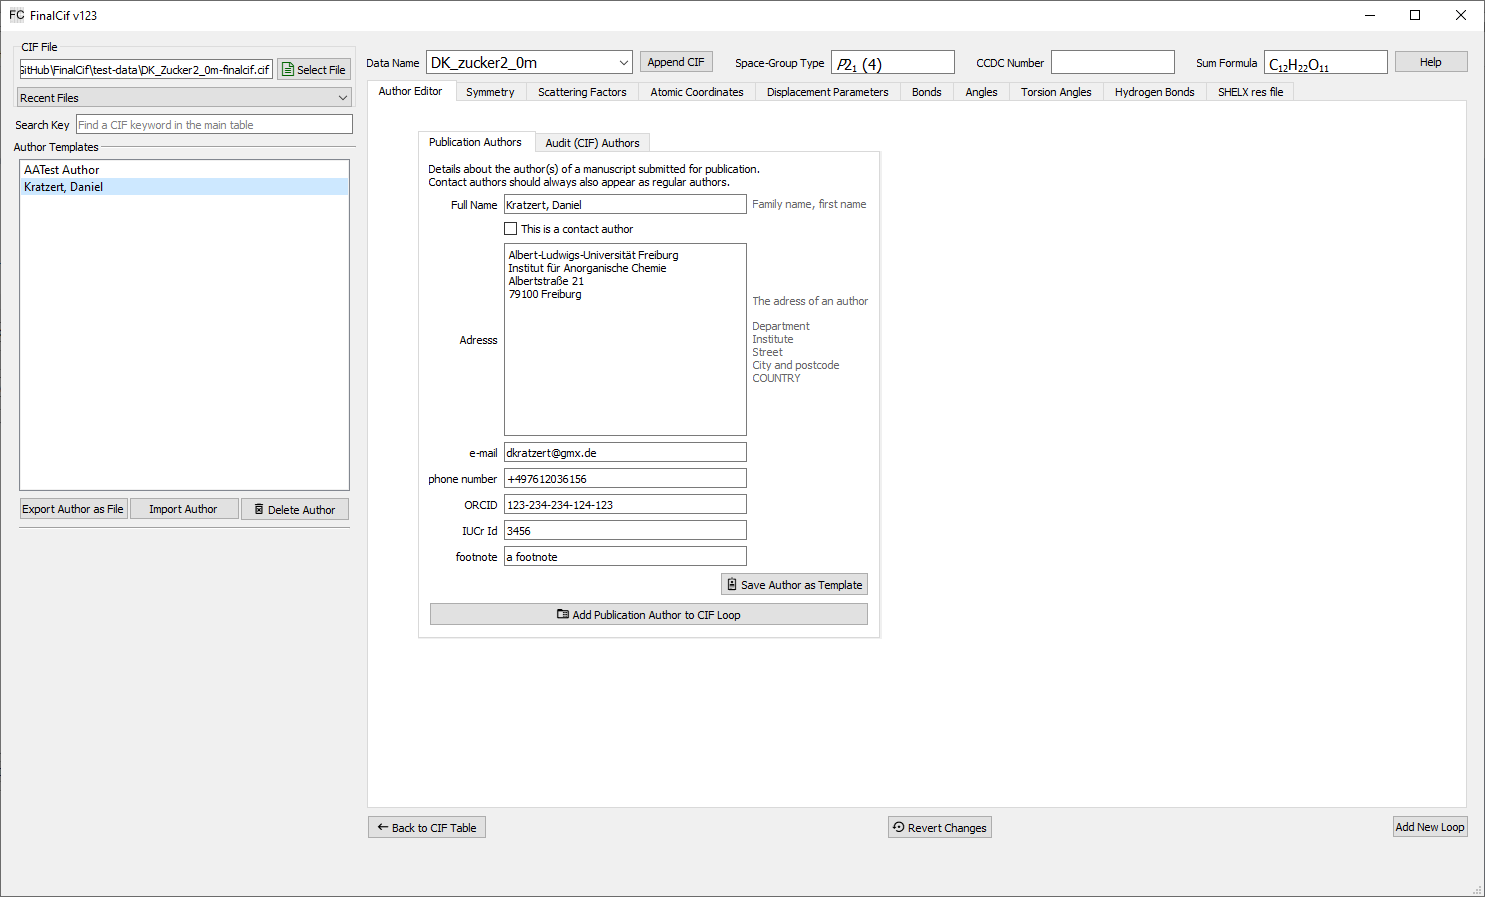
FinalCif is also able to edit loop data from a CIF file by clicking the “Edit Loops” button. Each loop has its own tab where the loop data is represented as a table. All fields changed by the user will turn pale blue to indicate modifications and these are saved during the next file save.
Rows can be appended and deleted with a right click on a table. The right-click menu also allows to change the ordering of loop rows by moving a row up or down.
The “revert changes” button reverts all changes done to the current loop, except for adding, deleting and moving rows.
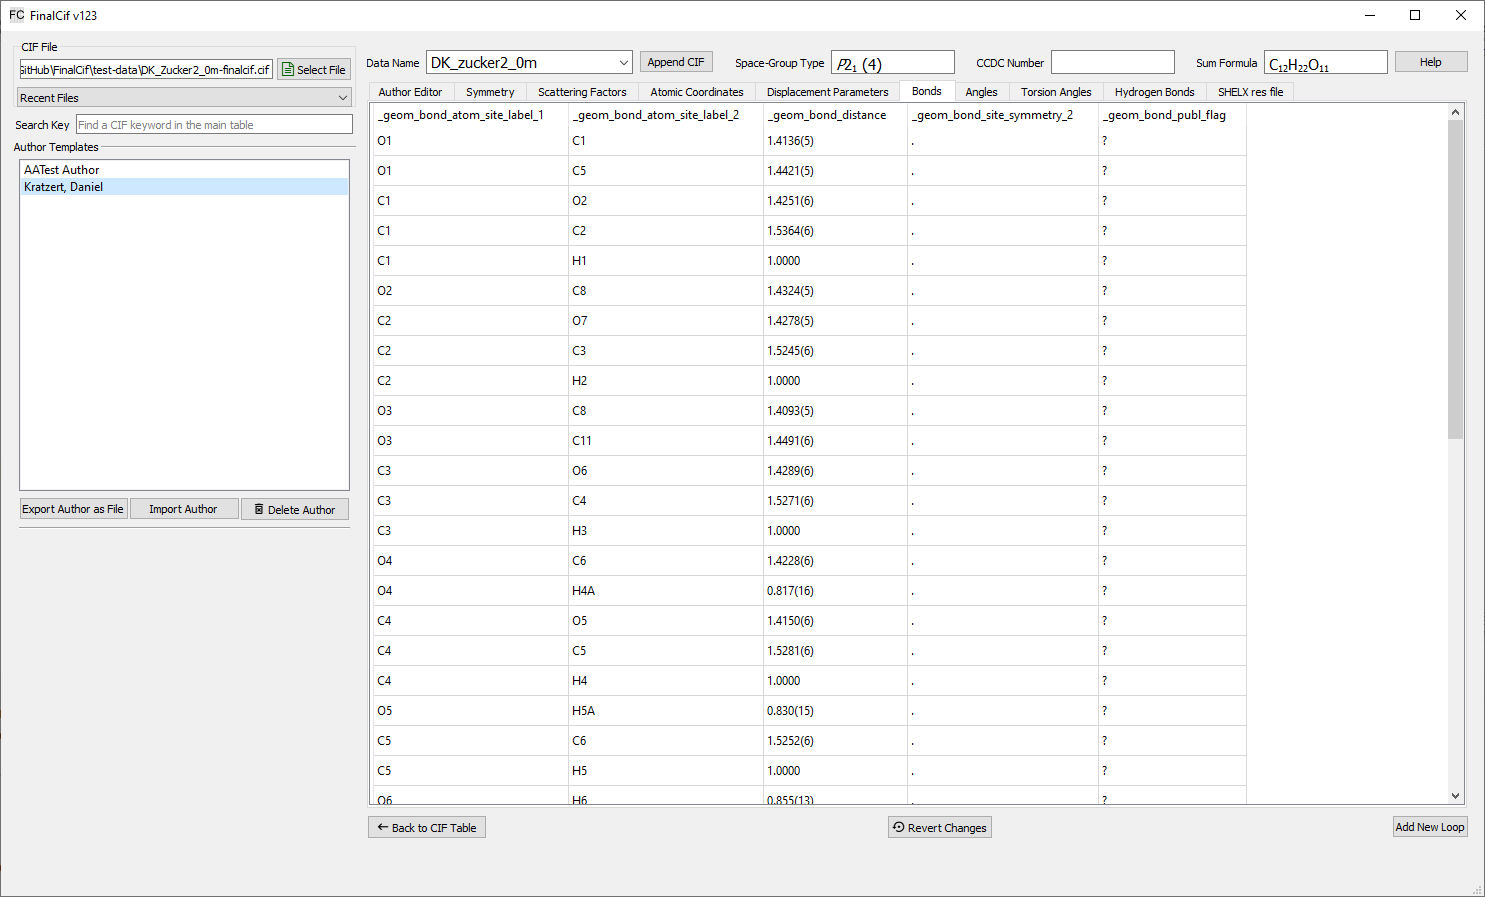
Atomic coordinates table (loop)
Most loop values are also checked by validators and their fields turn red if they are identified as invalid. (Previous versions of FinalCif marked changed values in red!)
CheckCif
FinalCif can help you doing CheckCIF. Three options are available:
Online with html report
Online with pdf report
Offline with your local PLATON installation
The two online option send the CIF to the IUCr server https://checkcif.iucr.org/ and do a CheckCIF run there. The offline option will never send the CIF anywhere. It runs on your own computer, but PLATON has to be installed and reachable by the systems PATH variable. any CheckCIF can be performes with or without structure factors (hkl data). Without structure factors has the advantage of beeing fast, but the resulting ckecks are far less deeply.
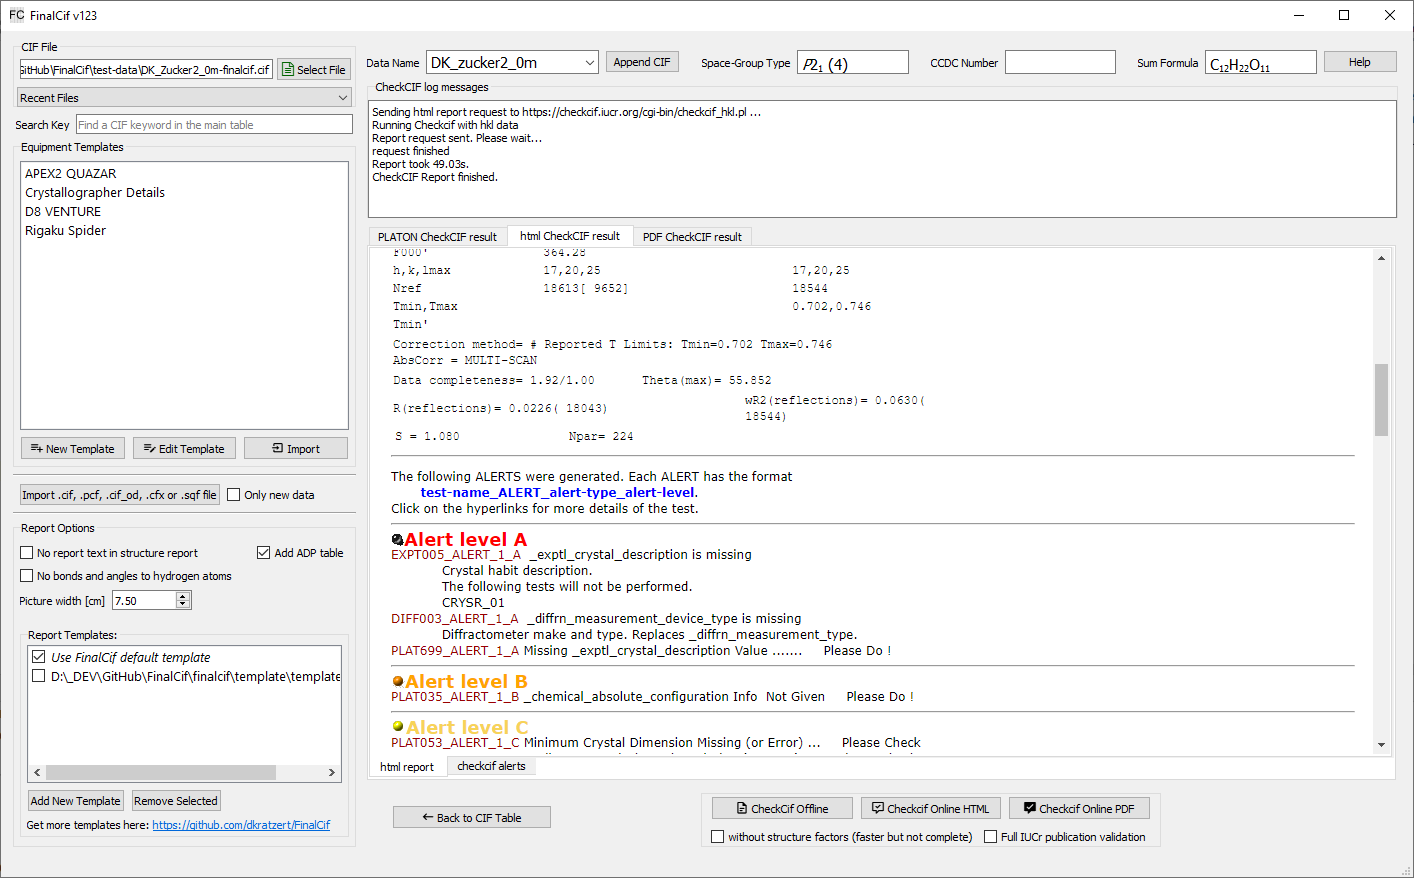
Results from a checkcif run.
Validation Response Forms (_VRF)
Sometimes you have to explain certain alerts from CheckCIF. For example regarding the experiment resolution. This is done via validation response forms. FinalCif has a convenient method to do so. After a “CheckCIF Online HTML” with structure factors you have the option to click on “Edit Response Forms”. There you have the possibility to reply to A, B or C level alerts and save them to the CIF. This works also with multi-CIFs. The respective data block name after the alert numbers indicates the respective CIF file.
Common responses can be saved for later use. See the templates section how to do this.
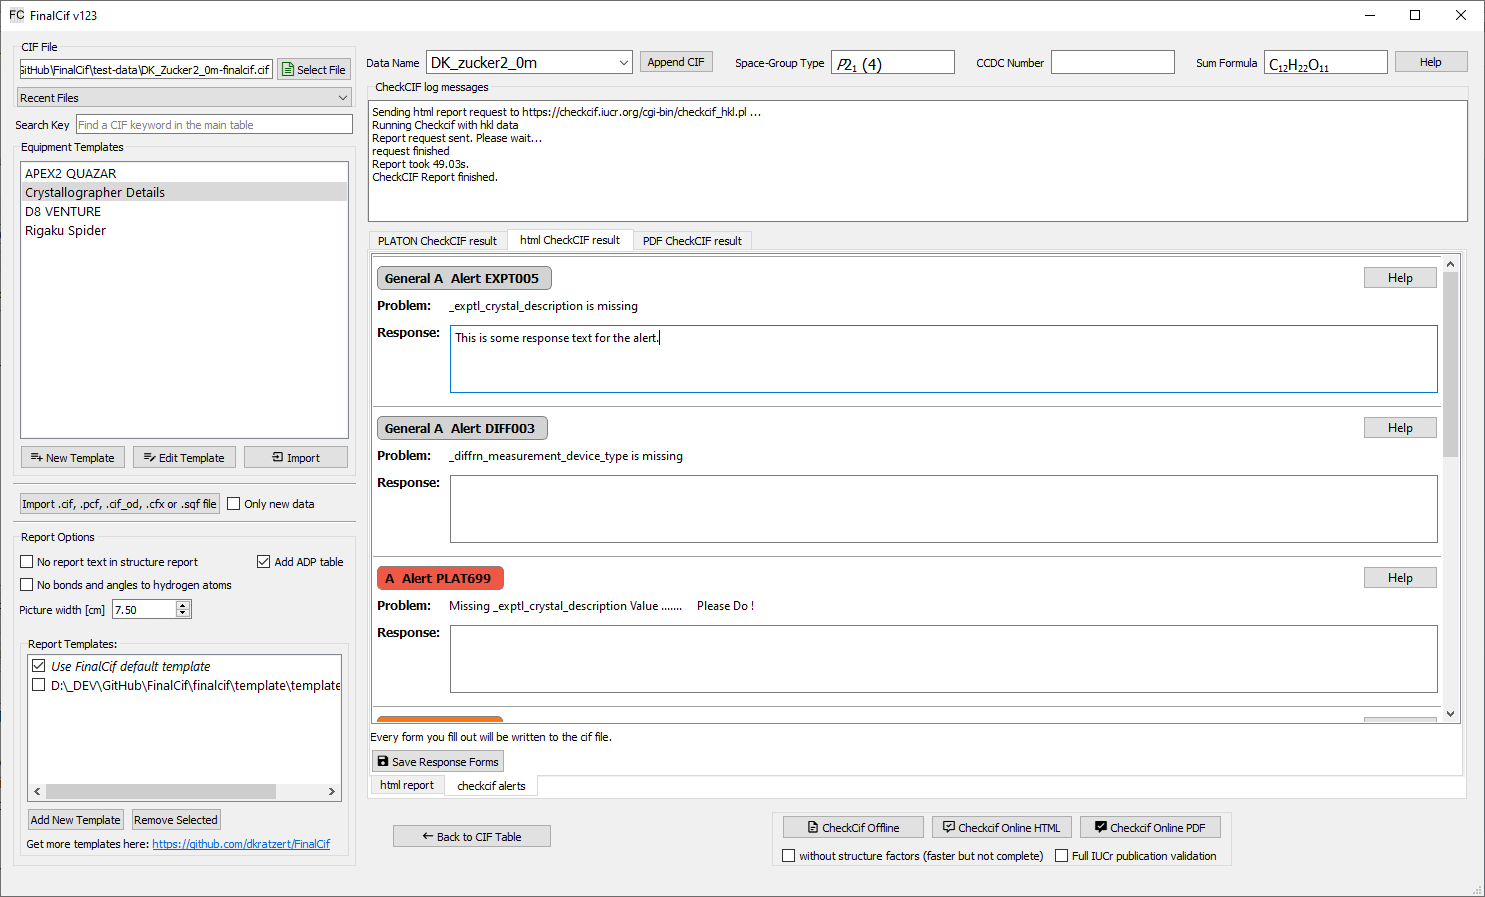
Validation response form editor.
A resulting response form:

A single response form in the FinalCif main table.
Structure of a validation response form
_vrf_<alert>_<data block>
;
PROBLEM: <alert description>
RESPONSE:
<free text>
;
<alert> corresponds to the alert code in CheckCIF which is the part until the first underscore. E.g., in “PLAT911_ALERT_3_C”, it would be “PLAT911”. The alert level “ALERT_x_A/B/C” cannot be included.
The line starting with “PROBLEM” is optional and can be omitted. Entering the “wrong” text for a given alert, won’t change anything.
The line “RESPONSE:” is essential. If this line is missing, the VRF will not be recognized.
There is only one VRF possible per error code. Replies to multiple alerts with the same code, even if on different A, B or C level and for different atoms, have to be grouped in one VRF reply.
<data block> is the datacode after the data block indiator “data_<data block>”. FinalCif automatically renames the <data block> item of the vrf if you rename the <data block> of the CIF file.
Report Document
FinalCif is able to render a nice looking report document as MS Word format from the information contained in the CIF. For a complete report, you have to finish the CIF first. It is also advisable to deposit the file before the report generation in order to have the CCDC number listed in the report text.
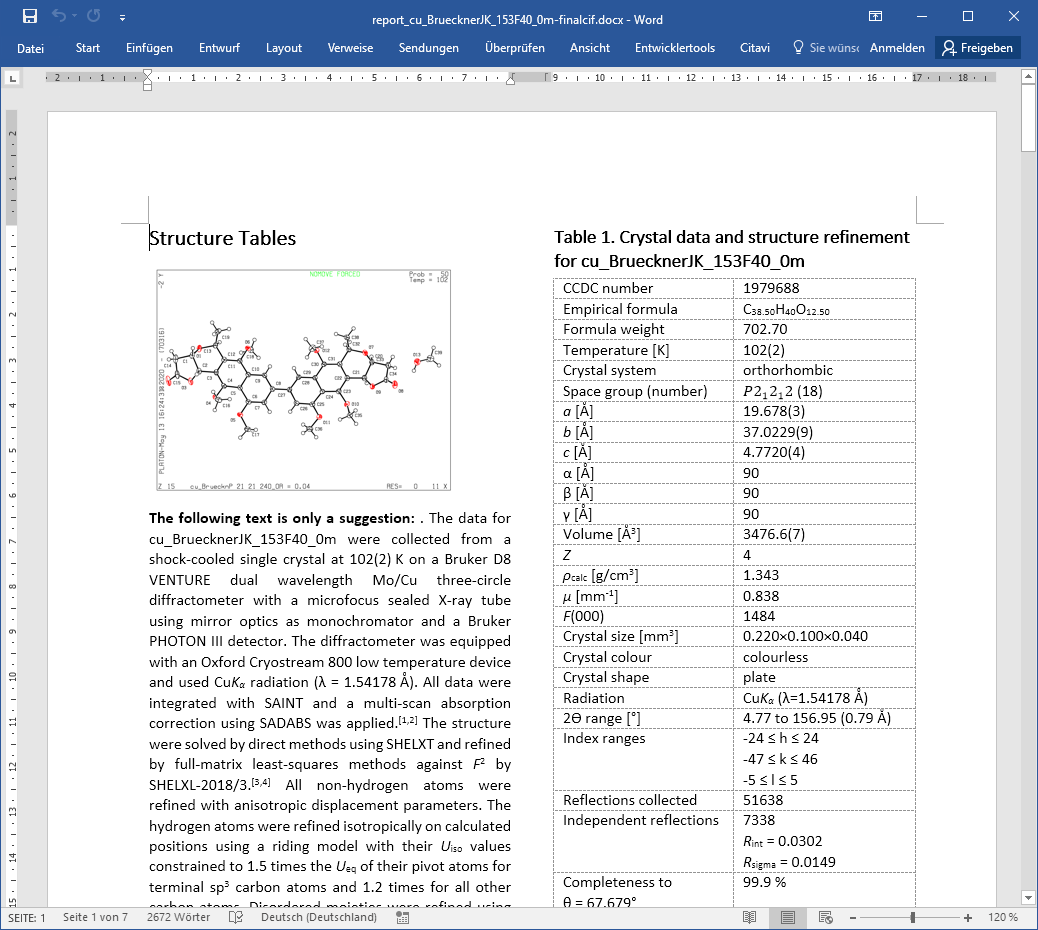
A report document example.
With a multi-CIF opened, also a report document where the values of all data_ blocks are together in one table is written to [filename]-multitable.docx.
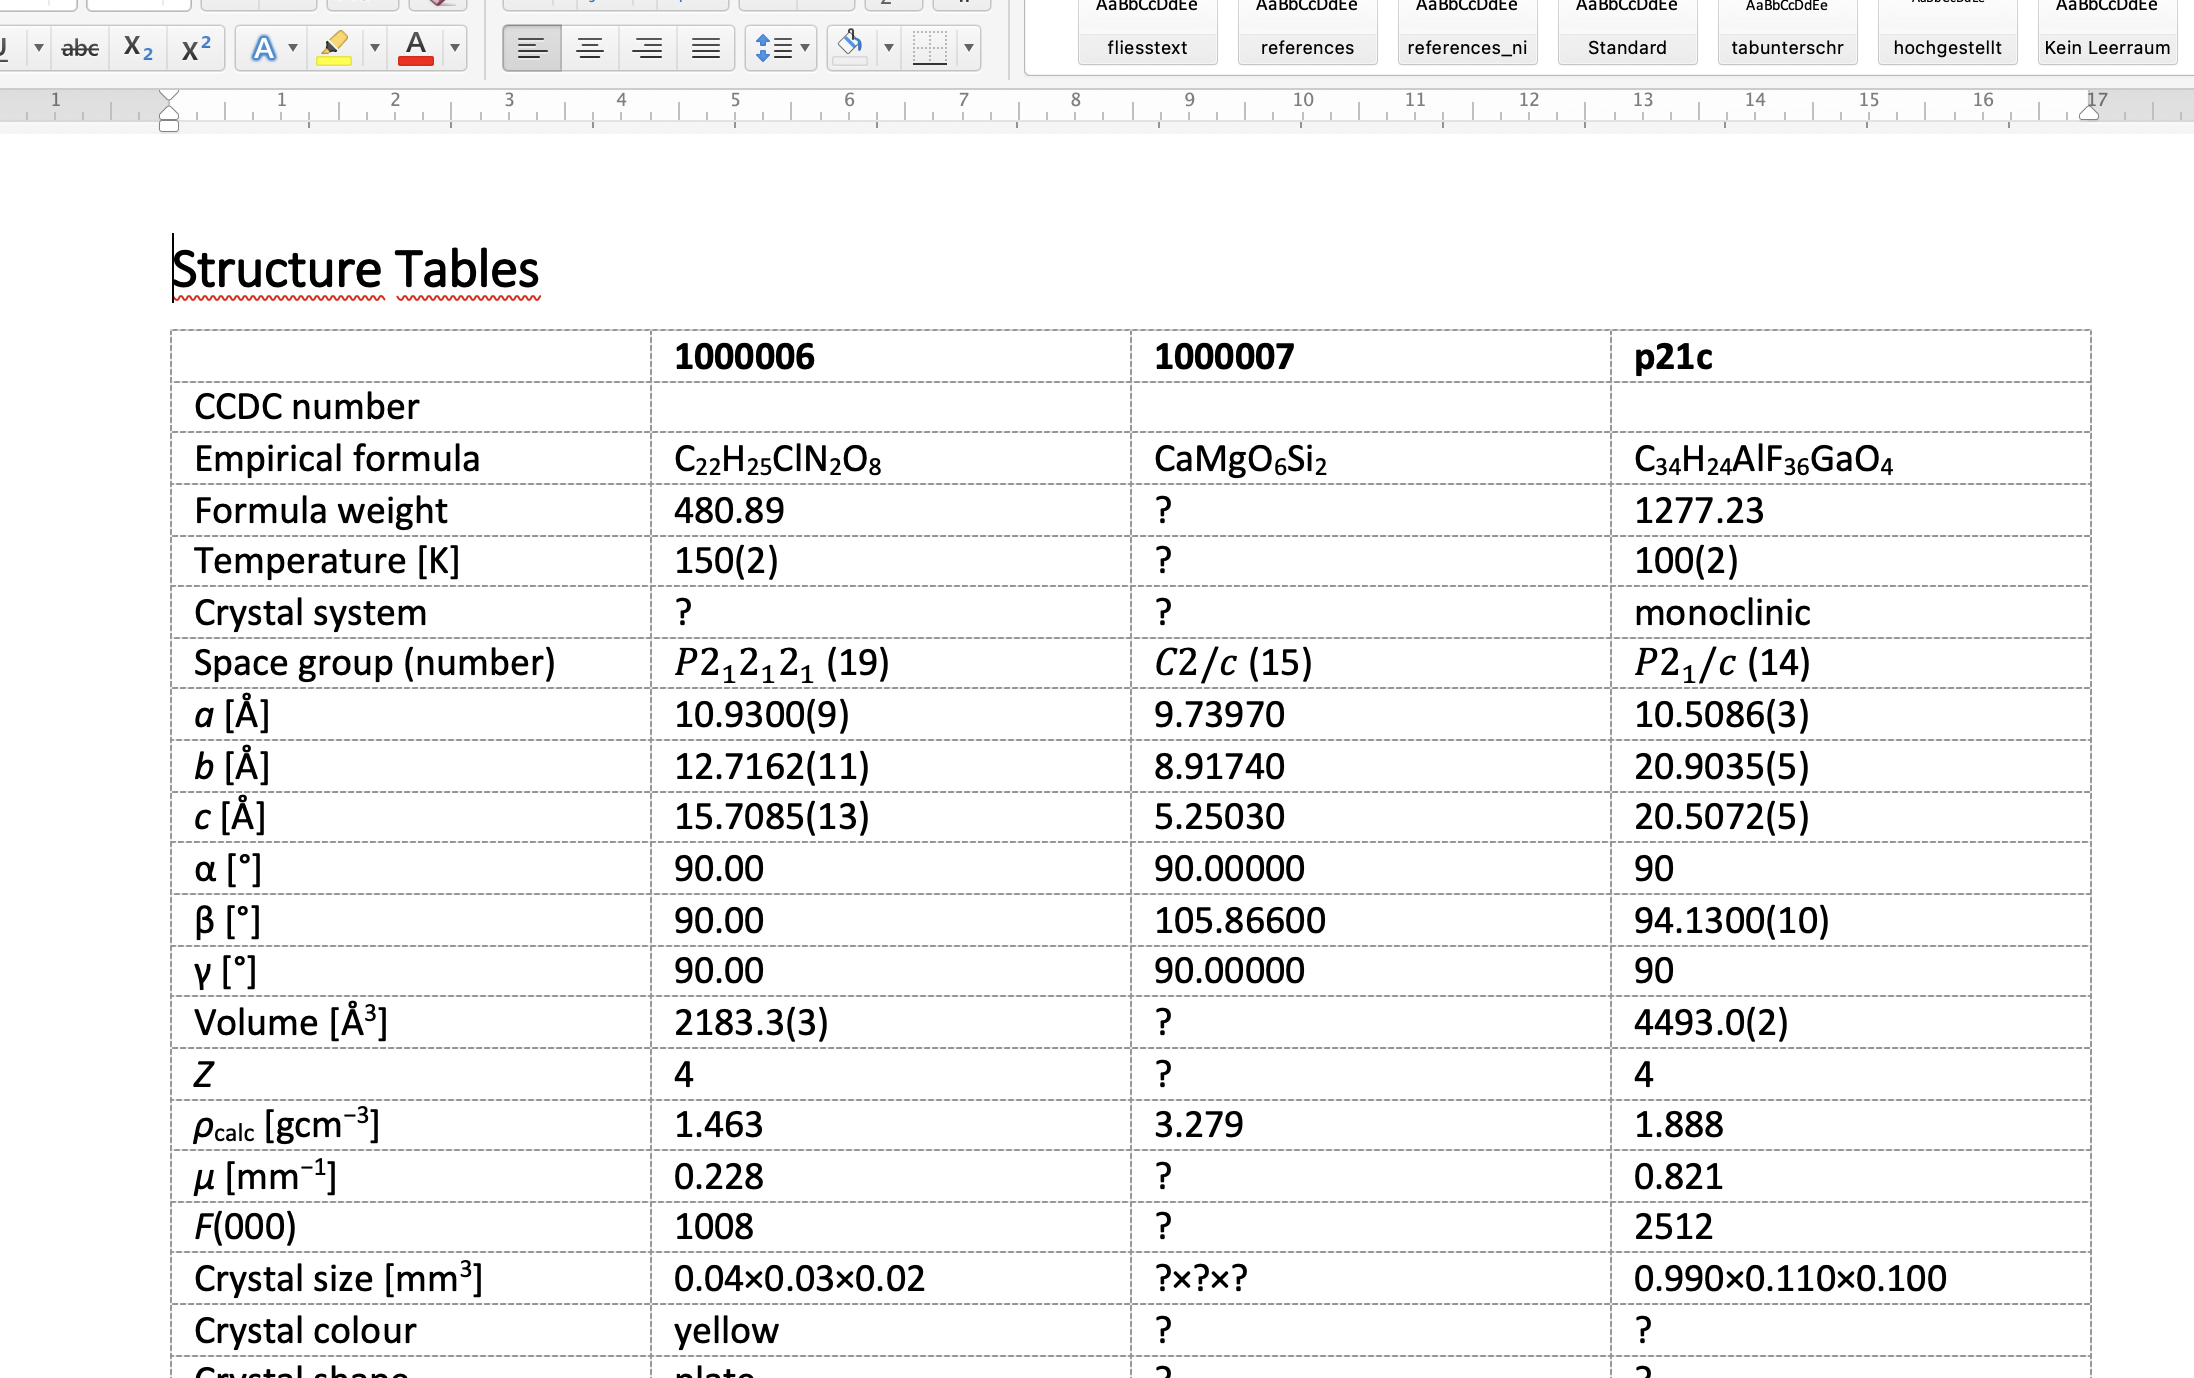
A report document from a multi-CIF.
CCDC Number
There are two ways of introducing the CCDC number into the .cif file:
Edit the ‘CCDC Number’ field in the top of FinalCif. The number will be saved in the key ‘_database_code_depnum_ccdc_archive’.
Drag&Drop the deposition response email from the CCDC (in EML format) into the work folder and reload the .cif file.
Picture
FinalCif can add a picture of your structure to the report document.
Either by previously performing an html or local checkcif. Then it automatically adds a picture from the checkcif report, as in the example above.
Or you can add any other picture with the “Picture for Report” button.
A different possibility is the ‘Show Details’ page where you can use the current structure view as picture for the report:
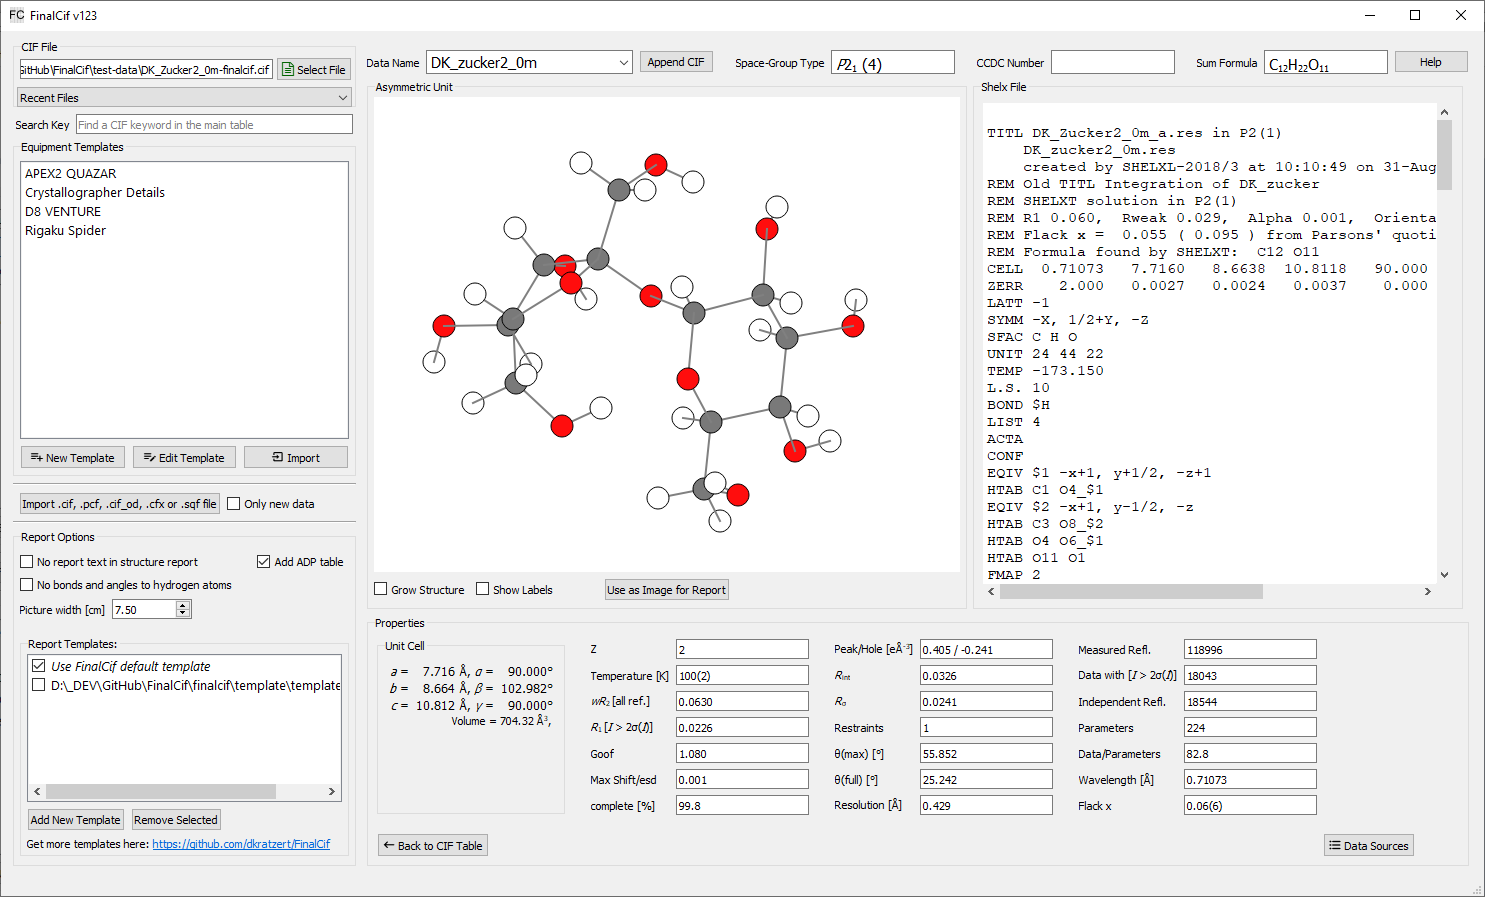
The Details page.
The details page also allows to select a picture of the crystal from a video file (either Bruker .vzs or Rigaku .jpg) The crystal can be rotated with the mouse wheel and zoomed by left-click and drag of the mouse. A right-click restores the default zoom.
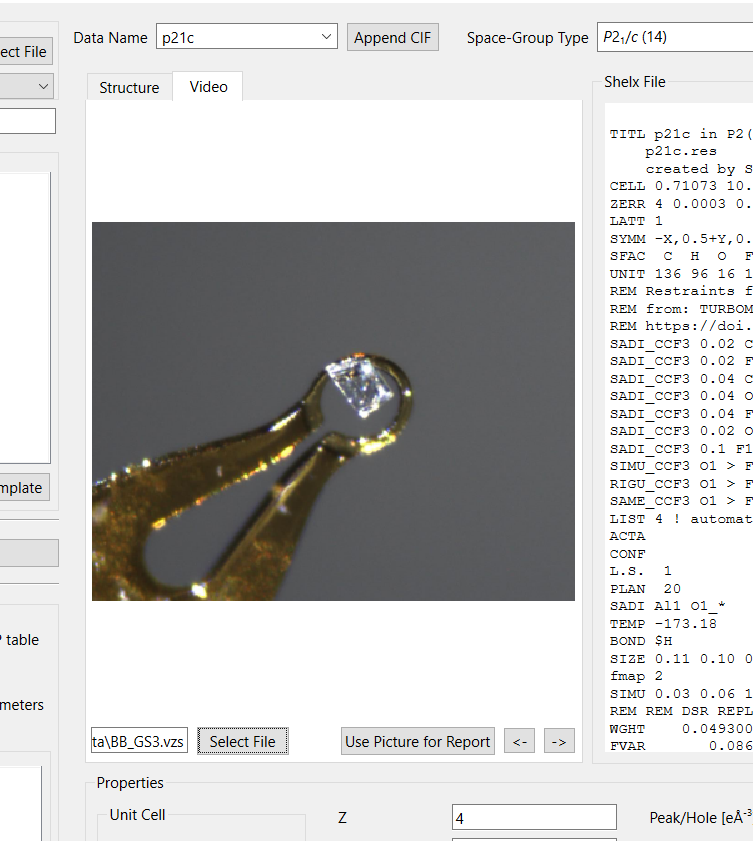
The crystal video selection.
Bonds and Angles Tables
By default, the report document contains tables for bonds, angles, torsion angles and hydrogen bonds of all atoms. It is also possible to tabulate only a selection by entering ‘y’ or ‘yes’ at the corresponding atom row in the _geom_[angle/bond/torsion/hbond]_publ_flag column of the loop editor. On the other hand, ‘n’ or ‘no’ disables a table row.
Customizing the Report
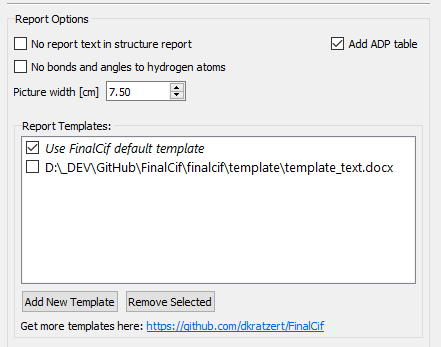
Report options with two templates.
Do you have specific expectations regarding the appearance of the structure report? With self-defined templates this is possible in FinalCif. You can find example templates at https://github.com/dkratzert/FinalCif. It is easier to change them than to create them from scratch.
The templates are an ordinary MS Word document (more specific: Office Open XML, https://de.wikipedia.org/wiki/Office_Open_XML) So you can use them with MS Word, Openoffice or Libre Office and other Office Open capable programs.
FinalCif uses the Jinja2 template language to exchange specific instructions in the templates with precalculated information and direct values from the CIF file. Be careful with the ‘Track Changes’ feature of MS Word. It tends to create incompatible template documents, but it can be fixed with the ‘accept all changes’ option in Word. This accepts all changes and the template document is behaving ‘normal’ again.
In the templates, you have two different types of information to add:
A variable, starting with {{ and ending with }}, for example:
{{ a_variable }}This would insert the content of the variable ‘a_variable’ at this point in the document during the report generation.A block, starting with {% and ending with %}, for example:
Foo bar {% if a_variable %} Put this text here {% endif %} Some other text.
This would put the text enclosed in the block into the document depending if either a_variable
has a value or not.
The second possibility for blocks is to iterate over the values of a Python dictionary:
{% for atom in atoms %}
   {{ atom.label }}
{% enfor %}
Produces a list of all atom names in a CIF.
If you need a table, {%tr foo %} is used to generate table rows.
The information of the regular table loop can be extended by utilizing the Python zip function:
Atom          x     y         z        Ueq    ADP type
{%tr for atom, adp_type in zip(atomic_coordinates, cif.block.find_loop('_atom_site_adp_type')) %}
    {{atom.label}}  {{ atom.x }}    {{ atom.y }}    {{ atom.z }}    {{ atom.u_eq }}   {{ adp_type }}
{%tr endfor %}
That way, it is possible to access any column from the _atom_site loop.
This was only a brief introduction to what is possible with the Jinja template language. The links at the end of this chapter go far mor into details.
Data Available for the Report
'cif'                   : Gives you access to the full CIF information, use it like
                          {{ cif._exptl_crystal_density_diffrn }} or the variables in the next table.
'name'                  : Name of the current CIF block.
'block'                 : The context of all CIF blocks of a multi-CIF usable as attribute, e.g. block.name.foo or block['name'].foo
'blocklist'             : A list of all CIF blocks of a multi-CIF usable for iteration over blocks.
'atomic_coordinates'    : The atomic coordinates as ('label', 'type', 'x', 'y', 'z', 'u_eq', 'part', 'occ') for each atom.
'displacement_parameters': The atomic displacement parameters as ('label', 'U11', 'U22', 'U33',
                           'U23', 'U13', 'U12') for each atom.
'dist_unit'             : Unit for bond lengths (Angstrom or picometers).
'vol_unit'              : Unit for unit cel volume (Angstrom^3 or namometers^3).
'bonds'                 : The bonds with lengths as ('atoms', 'dist') for each atom pair.
'angles'                : The bond angles as ('atoms', 'angle') for each atom triple.
'ba_symminfo'           : The symmetry operations used to generate equivalent atoms in the angles list.
'torsions'              : The torsion angles as ('atoms', 'angle') for each atom quartet.
'torsion_symminfo'      : The symmetry operations used to generate equivalent atoms in the torsion angles list.
'atoms_refinement'      : Automatic text describing the modelling and refinement of heavy atoms.
'disorder_descr'        : Automatic text describing the modelling and refinement of disorder.
'hydrogen_atoms'        : Automatic text describing the modelling and refinement of hydrogen atoms.
'hydrogen_bonds'        : The hydrogen bonds (in case there are some defined with HTAB) as
                           ('atoms', 'dist_dh', 'dist_ha', 'dist_da', 'angle_dha').
'hydrogen_symminfo'     : The symmetry operations used to generate equivalent atoms in the hydrogen bonds list
'literature'            : A list of citations to the above used programs, e.g. literature.integration.richtext.
                          The richtext attribute formats the citation. Available literature:
                          ('integration', 'absorption', 'solution', 'refinement', 'ccdc', 'finalcif', 'dsr')
'options'               : A dictionary with {'without_h': True/False, 'atoms_table': True/False,
                          'report_text': True/False, 'report_adp': True/False, 'bonds_table': True/False,
                          'use_picometers': True/False},
'space_group'           : The space group formatted as formula object.
'structure_figure'      : A picture selected with the 'Picture for Report' button.
'crystallization_method': The value of '_exptl_crystal_recrystallization_method'
'sum_formula'           : The formatted version of '_chemical_formula_sum' with subscript numbers.
'moiety_formula'        : The formatted version of '_chemical_formula_moiety' with subscript numbers.
'itnum'                 : The space group number from the international tables.
'crystal_size'          : The crystal size as X x Y x Z.
'crystal_colour'        : The crystal colour.
'crystal_shape'         : The crystal shape.
'radiation'             : The radiation type used like MoK_alpha.
'wavelength'            : The wavelength in nm.
'theta_range'           : The theta range.
'diffr_type'            : The measurement device type.
'diffr_device'          : The measurement device.
'diffr_source'          : The radiation source.
'monochromator'         : The monochromator.
'detector'              : The detector model.
'lowtemp_dev'           : The low-temperature device.
'index_ranges'          : The preformatted index ranges.
'indepentent_refl'      : The number of independent reflections.
'r_int'                 : The R_int of the data.
'r_sigma'               : The R_sigma of the data.
'completeness'          : The completeness of the data.
'theta_full'            : The resolution of the dataset in degree theta.
'data'                  : the value of '_refine_ls_number_reflns'.
'restraints'            : The value of '_refine_ls_number_restraints'.
'parameters'            : The value of '_refine_ls_number_parameters'.
'goof'                  : The value of '_refine_ls_goodness_of_fit_ref'.
't_min'                 : The value of '_exptl_absorpt_correction_T_min'.
't_max'                 : The value of '_exptl_absorpt_correction_T_max'.
'ls_R_factor_gt'        : The value of '_refine_ls_R_factor_gt'.
'ls_wR_factor_gt'       : The value of '_refine_ls_wR_factor_gt'.
'ls_R_factor_all'       : The value of '_refine_ls_R_factor_all'.
'ls_wR_factor_ref'      : The value of '_refine_ls_wR_factor_ref'.
'diff_dens_min'         : The minimum residual density in e/A^3.
'diff_dens_max'         : The maximum residual density in e/A^3.
'exti'                  : The extinction coefficient.
'flack_x'               : The value of the flack X parameter.
'integration_progr'     : The name of the integration program used.
'abstype'               : The value of '_exptl_absorpt_correction_type'.
'abs_details'           : The name of the absortion correction program used.
'solution_method'       : The structure solution method used.
'solution_program'      : The name of the structure solution program.
'refinement_prog'       : The name of the refinement program.
'refinement_gui'        : The name of the graphical user interface used for model building and refienement.
'refinement_details'    : The text of '_refine_special_details'.
'resolution_angstrom'   : The resolution of the experiment in Å.
'redundancy'            : The value of _diffrn_reflns_number / _reflns_number_total
'bootstrap_css'         : Bootstrap CSS library used for a html report: https://getbootstrap.com/.
'references'            : A list of references used in the document. Each reference can be accessed by its number, where
                          it can be accessed as html, richtext or text.
Other useful information in the ‘cif’ variable:
'cif.res_file_data'          : The SHELX .res file text.
'cif.is_centrosymm'          : It true if the space group of the structure is centrosymmetric.
'cif.atoms'                  : The list of atoms with 'label', 'type', 'x', 'y', 'z', 'part',
                                                      'occ', 'u_eq'.
'cif.hydrogen_atoms_present' : Is true if hydrogen atoms are present in the structure.
'cif.disorder_present'       : Is true if atoms in parts are present in the structure.
'cif.cell'                   : The unit cell as 'a', 'b', 'c', 'alpha', 'beta', 'gamma', 'volume'.
'cif.bonds'                  : The list of bonds as 'label1', 'label2', 'dist', 'symm'.
'cif.bond_dist("atom1-atom2")'    : The bond distance between two atoms.
'cif.angle("atom1-atom2-atom3")'  : The angle between three atoms.
'cif.torsion("atom1-atom2-atom3-atom4")'  : The torsion angle between four atoms.
'angles'                     : The list of angles as 'label1', 'label2', 'label3', 'angle_val',
                               'symm1', 'symm2'.
'torsion_angles'             : The list of torsion angles as 'label1', 'label2', 'label3', 'label4',
                               'torsang', 'symm1', 'symm2', 'symm3', 'symm4'.
'hydrogen_bonds'             : The list of hydrogen atoms involved in HTAB listings as 'label_d',
                               'label_h', 'label_a', 'dist_dh', 'dist_ha', 'dist_da', 'angle_dha',
                               'symm'.
'test_res_checksum'          : True if the checksum of the SHELX .res file fits to the file content.
'test_hkl_checksum'          : True if the checksum of the SHELX .hkl file fits to the file content.
The cif variable contains values from the CIF in ascii format directly. Be aware that negative values have a hyphen and no real minus sign in front. The former listed values have hyphens replaced with minus signs.
The special methods listed above, allows you to access the values of the atoms, bonds, angles, torsion angles of single- and multi-CIF files:
{{ block['p-1'].cif.bond_dist('C1-C2') }}
{{ block['p-1'].cif.angle('C1-C2-C3') }}
Prints out the distance between C1 and C2 as well as the angle between C1, C2 and C3. This can be used to render specific bond distances etc. of a multi-CIF file to a publication without the need to change the values by hand every time a refinement changes. Be aware that the atom labels must be given in the order they have in the respective CIF loop. When an atom combination is not present in a CIF loop, the value ‘None’ will appear.
For a single-CIF, leave out the “block[‘block name’].” part:
{{ cif.bond_dist('C1-C2') }}
The procedures in this chapter are not limited to the templates of FinalCif. It is also possible to insert template tags into any other Word document and replace them with values from a CIF file. There are no limits to the imagination. Sine version 130, it is possible to address the values of individual blocks of a multi-CIF. For example,
{% for block in blocklist %}
   {{ block.name }}
{% enfor %}
prints all block names of a multi-CIF.
Another option is to utilize the ‘block’ variable in the template. It holds the respective block data. To access the values of the block, you need to use the block name in square brackets and enclosed in quotation marks. This prevents conflicts with Jinja2 syntax and potential characters in CIF blocks, such as the minus sign in ‘p-1’, which would otherwise be interpreted as variable p minus one. For example, the chemical formula of the block ‘compound1’ of a multi-CIF is:
{{ block['compound1']._chemical_formula_sum }}
Further information how to make templates for MS Office or Openoffice: https://docxtpl.readthedocs.io/en/latest/ https://jinja.palletsprojects.com/en/3.1.x/
Database Deposition
In order to archive CIF files and to make them publicly available, there are two major databases for deposition. The most commonly used is the Cambridge Structural Database (CSD, https://www.ccdc.cam.ac.uk/). A younger database is the Crystallography Open Database (COD, https://www.crystallography.net/cod/). While the CSD ist a commercial product with an annual pricing, the COD is open for everyone.
FinalCif has two buttons for depositing in the respective database, but they behave very differently. The button for the CSD (“CCDC Deposit”) only points to the CSD website, while the button for the COD (“COD Deposit”) opens an upload interface in FinalCif.
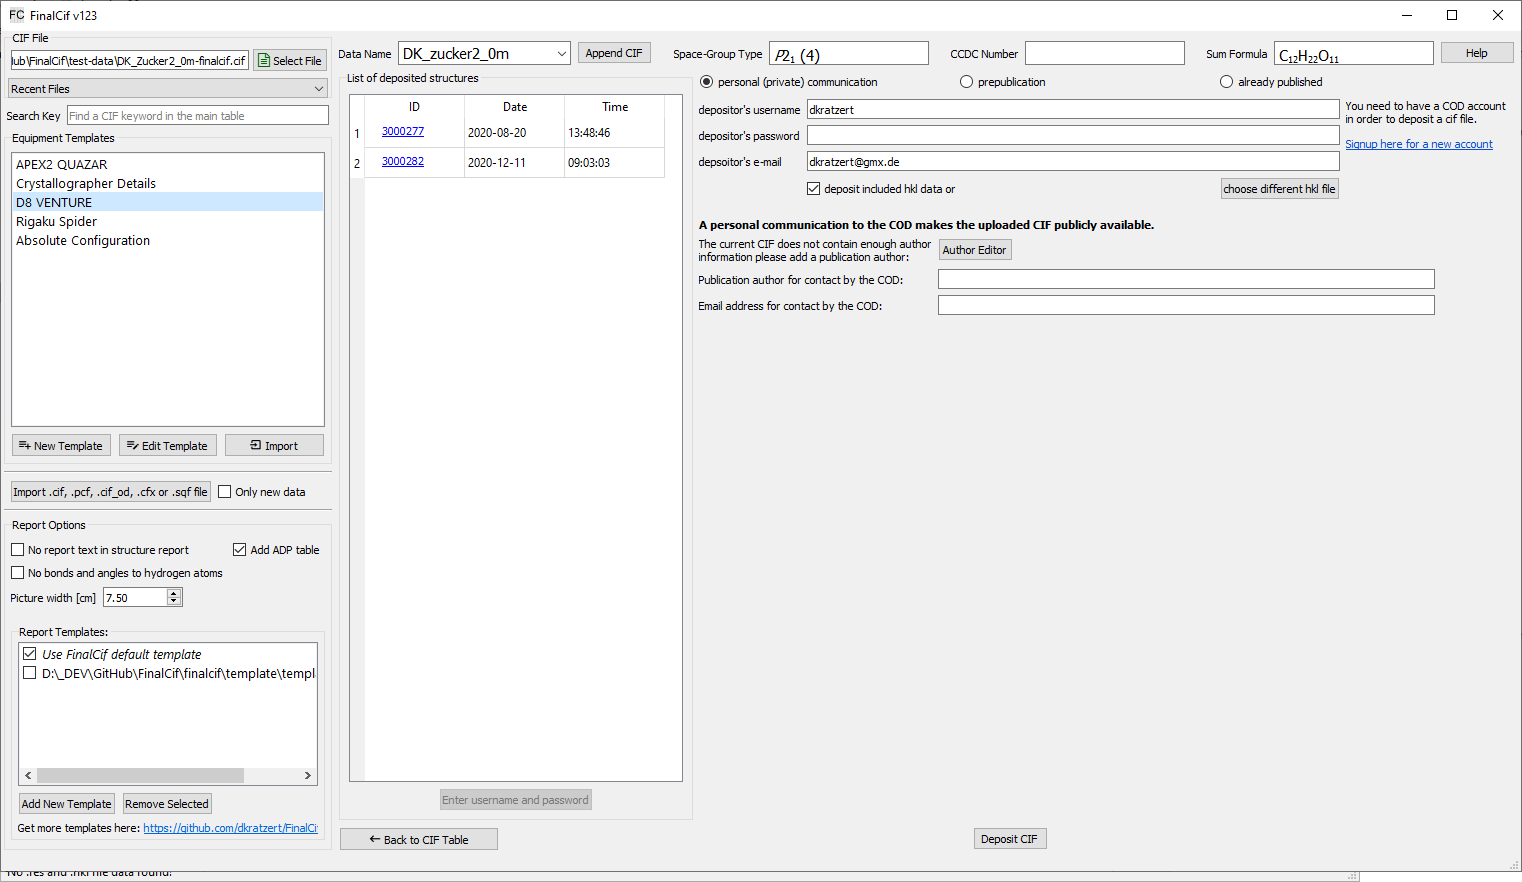
The COD deposition interface
The COD interface has three major options: “personal communication”, “prepublication” and “already published” Before the first upload attempt, you have to signup for an account at http://crystallography.net/cod/. With that username, password and email adress, you can use the FinalCif interface. On the left hand side, you see a list of already deposited structures, unless you entered username/password and refreshed the list.
COD deposition is not available in multi-CIF mode.
personal communication (private communication)
The personal communication acts like a publication in a journal. The CIF immediately becomes publicly available. Therefore, you must add at least one author name to the submitted CIF in the FinalCif author editor if there is not already an author in the CIF. This or these author(s) must not be a communication author, but a communication author can be added additionally.
prepublication
The prepublication option is the choice for deposition prior to a publication in a scientific journal. As with personal communications, you have to submit at least one author. Additionally, you have to give a journal name and the hold period until the COD will contact you in order to ask about the current status of the publication. During the hold period, The CIF is only accessible by the depositor unless it is either published in a journal or as personal communication in the COD.
already published
The already published option is for structures that have already been published in a journal and which have a DOI (https://www.doi.org/). In order to deposit an already published CIF, you have to insert the publication DOI into the respective field and click “Get Citation”. After the publication information was fetched, you can upload the CIF.
Running from Source Code
In case you want to play with the source code and make your own modifications to FinalCif, get the code from Github.
In order to run FinalCif from the source code directly, you need to install Python3 >= 3.7 but >= 3.9 is advisable: https://www.python.org/
Until now, I was just too lazy to build proper Linux packages and therefore only single-file executables made with pyinstaller <https://www.pyinstaller.org/> exist. They are large and run sub-optimal in different Linux distributions.
But for Ubuntu, there is an installer script that does all steps necessary for an installation from source automatically. Apart from the Python installation, the script should work in any Linux or MacOS distribution:
First go into the directory where you like to have FinalCif, e.g.:
cd /home/username/Downloads
Load the script:
wget https://raw.githubusercontent.com/dkratzert/FinalCif/master/scripts/finalcif-start.sh
Make it executable:
chmod u+x ./finalcif-start.sh
Install Python3.9:
./finalcif-start.sh -pyinst
Install FinalCif:
./finalcif-start.sh -install
Run FinalCif:
./finalcif-start.sh
Next time, just run ./finalcif-start.sh.
Manual install from source
Clone the repository from GitHub:
git clone https://github.com/dkratzert/FinalCif.git
cd FinalCif
Install a virtual environment and activate it:
install_requirements.bat
Run FinalCif:
run_finalcif.bat
I am always open for suggestions by users. Please tell me if something does not work as expected!
FinalCif uses the great gemmi CIF parser for all CIF reading and writing operations.
